Analysis tools
Here we will outline some of the available tools that can help inspect the performance of the emulator. The example data will be the Schecter function example:
import swiftemulator as se
from swiftemulator.emulators import gaussian_process
import numpy as np

def log_schecter_function(log_M, log_M_star, alpha):
    M = 10 ** log_M
    M_star = 10 ** log_M_star
    return np.log10( (1 / M_star) * (M / M_star) ** alpha * np.exp(- M / M_star ))

model_specification = se.ModelSpecification(
    number_of_parameters=2,
    parameter_names=["log_M_star","alpha"],
    parameter_limits=[[11.,12.],[-1.,-3.]],
    parameter_printable_names=["Mass at knee","Low mass slope"],
)

log_M_star = np.random.uniform(11., 12., 100)
alpha      = np.random.uniform(-1., -3., 100)

modelparameters = {}
for unique_identifier in range(100):
    modelparameters[unique_identifier] = {"log_M_star": log_M_star[unique_identifier],
                                        "alpha": alpha[unique_identifier]}

model_parameters = se.ModelParameters(model_parameters=modelparameters)

modelvalues = {}
for unique_identifier in range(100):
    independent = np.linspace(10,12,10)
    dependent = log_schecter_function(independent,
                                    log_M_star[unique_identifier],
                                    alpha[unique_identifier])
    dependent_error = 0.02 * dependent
    modelvalues[unique_identifier] = {"independent": independent,
                                    "dependent": dependent,
                                    "dependent_error": dependent_error}

model_values = se.ModelValues(model_values=modelvalues)

schecter_emulator = gaussian_process.GaussianProcessEmulator()
schecter_emulator.fit_model(model_specification=model_specification,
                            model_parameters=model_parameters,
                            model_values=model_values)
Cross checks
To set up a cross check, the emulator is trained on all but one of the input data-sets. The resulting emulator can then be compared against the model that was left out.
Cross checks are the main way of quantifying emulator performance in the absence of validation data. When emulating via cosmological simulations it is likely to be very expensive to generate a validation dataset of sufficient size. for cases like this SWIFT-Emulator has an easy way of setting up cross-checks.
The swiftemulator.sensitivity.cross_check()
object acts identically to swiftemulator.emulators.gaussian_process()
and takes the same inputs. By setting the cross-checks
up in this way you can directly compare the results
with the main GP that you use for predictions.
from swiftemulator.sensitivity import cross_check

schecter_ccheck = cross_check.CrossCheck()
schecter_ccheck.build_emulators(model_specification=model_specification,
                        model_parameters=model_parameters,
                        model_values=model_values)
In this case build_emulators takes the place of fit_model. Note that build_emulators now creates N independent trained emulators, where N is the number of models, so this can take quite a long time. For this example the amount of models was reduced from 100 to 20.
Once the emulators have been build there are some inherent
tools to have a look at the result (see swiftemulator.sensitivity.cross_check()).
We will use build_mocked_model_values_original_independent()
to compare the cross-check predictions with the original
data.
import matplotlib.pyplot as plt

data_by_cc = schecter_ccheck.build_mocked_model_values_original_independent()

for unique_identifier in range(20):
    cc_over_og = data_by_cc[unique_identifier]["dependent"] / \
                model_values[unique_identifier]["dependent"]
    plt.plot(data_by_cc[unique_identifier]["independent"],cc_over_og)
    plt.xlabel("Mass")
    plt.ylabel("Cross-check / Truth")

plt.savefig("Cross_check_accuracy.png",dpi=200)
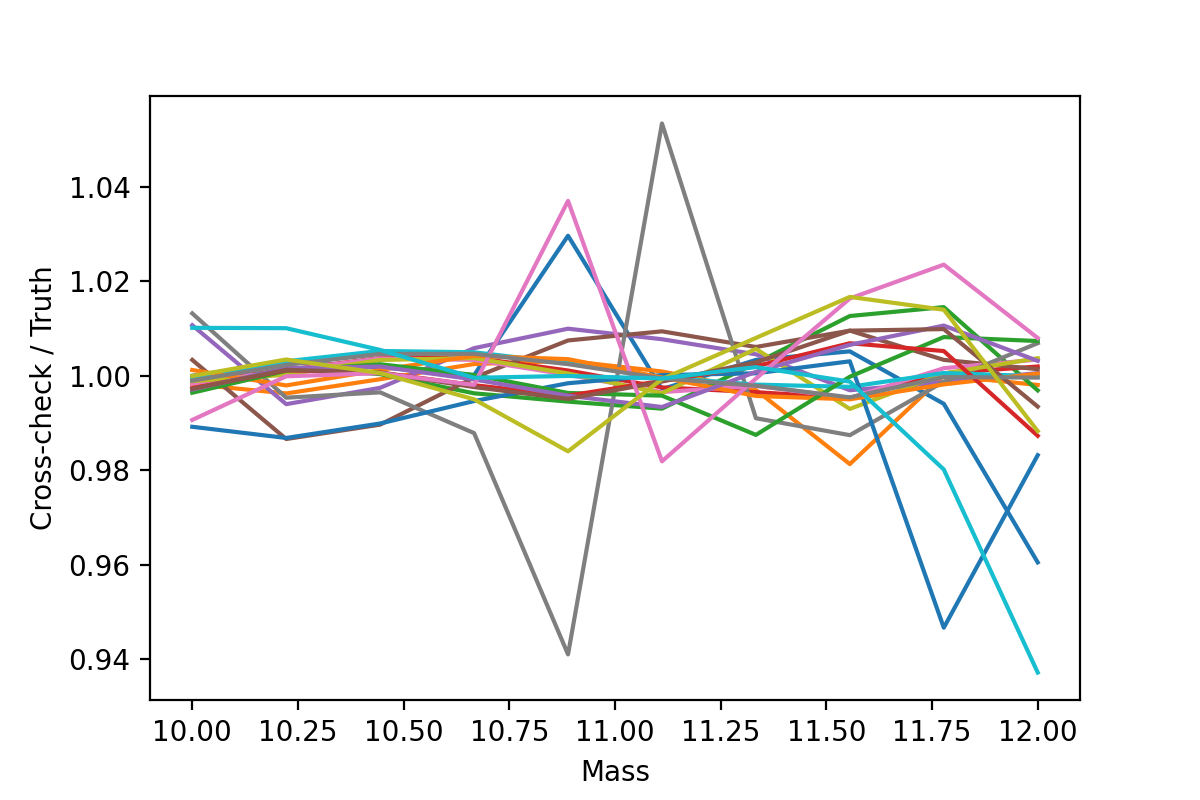
Just with a few line we are able to quantify how accurate the emulator is. Also note that any ModelValues container can be parsed as if it is a dictionary.
Sweeps Of Parameter Space
One of the advantages of using emulators is that it supplies you with a fully continuous model of the given function. Besides fitting the parameters it is often interesting to see the effect of changing a single parameter, by doing a sweep.
This is implemented into the SWIFT-Emulator with
swiftemulator.mocking.mock_sweep().
from swiftemulator.mocking import mock_sweep

center = {"log_M_star": 11.5, "alpha": -2.0}

Mock_values, Mock_parameters = mock_sweep(schecter_emulator
                                      ,model_specification
                                      ,6,"alpha",center)

for mock_name in Mock_values.keys():
    plt.plot(Mock_values[mock_name]["independent"],
            Mock_values[mock_name]["dependent"],
            label = "Alpha = " +str(Mock_parameters[mock_name]["alpha"])[:4])

plt.xlabel("Stellar mass")
plt.ylabel("dn/dlogM")
plt.legend()
plt.savefig("parameter_sweep.png",dpi=200)
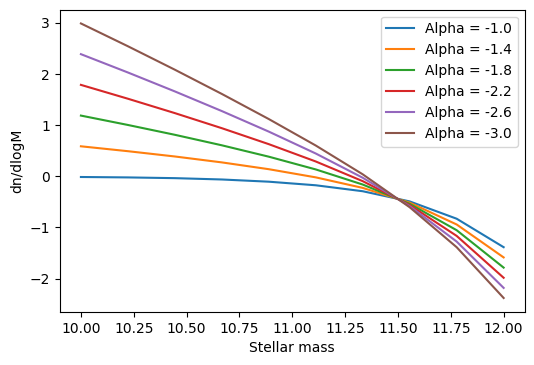
mock_sweep returns the values and parameter of the sweep as ModelValues and ModelParameters containers, that are easy to parse.
Model Parameters Features
This highlights two small functions that are attached to
the swiftemulator.backend.model_parameters()
object. The first is the ability to generate a quick plot
of the experimental design using corner.
model_parameters.plot_model(model_specification)
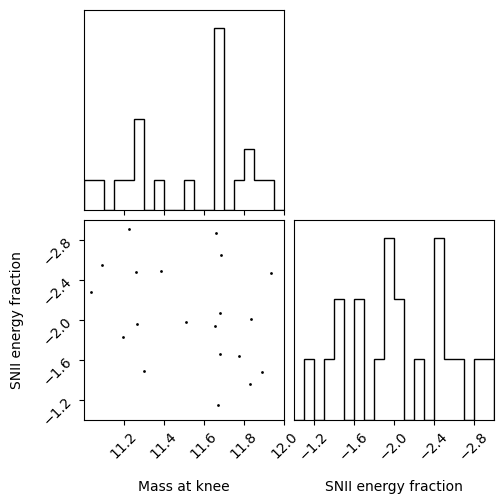
Note that the axis label used here are the one passed to the model specification. This can be used to have a quick look at whether your space is well sampled.
After finding a set of best fit model parameters it is sometimes usefull to see if there are any individual model that has similar values. find_closest_model takes a dictionary of input values and finds the training model that is closets to those values.
best_model = {"log_M_star": 11.3, "alpha": -2.1}

model_parameters.find_closest_model(best_model,number_of_close_models=5)
which outputs
([2, 12, 18, 19, 3],
[{'log_M_star': 11.26347510702813, 'alpha': -1.9614226414699145},
{'log_M_star': 11.507944778215956, 'alpha': -1.9818583963792449},
{'log_M_star': 11.19527147203741, 'alpha': -1.8330160108907092},
{'log_M_star': 11.033961506507945, 'alpha': -2.275313906753826},
{'log_M_star': 11.67912812994198, 'alpha': -2.0664526312834353}])
It returns a list with the unique_identifier of each close model, and the model parameters belonging to that model. This can be used to explore the models close to you best fit model, for example to check how well sampled that part of parameter space is.
Checking Hyperparameters
In general one should not look at the hyperparameters. They
should only be used as a diagnostic when the emulator is
giving strange results. The SWIFT-Emulator provides an
easy way to check the parameterspace of the hyperparameters.
The hyperparameters are optimised to using the
marginalised likelihood, so we can inspect how well converged
they are by looking at the probability distribution of each
individual hyperparameter. This is done via
swiftemulator.emulators.gaussian_process_mcmc().
In this case MCMC implies the use of Markov chian
Monte Carlo (via emcee) to find the best
hyperparameters, allowing us to look at the complete
parameter space.
from swiftemulator.emulators import gaussian_process_mcmc
schecter_emulator_mcmc = gaussian_process_mcmc.GaussianProcessEmulatorMCMC(burn_in_steps=1
                                                                          ,mcmc_steps=1000)
schecter_emulator_mcmc.fit_model(model_specification=model_specification,
                        model_parameters=model_parameters,
                        model_values=model_values)

schecter_emulator_mcmc.plot_hyperparameter_distribution()
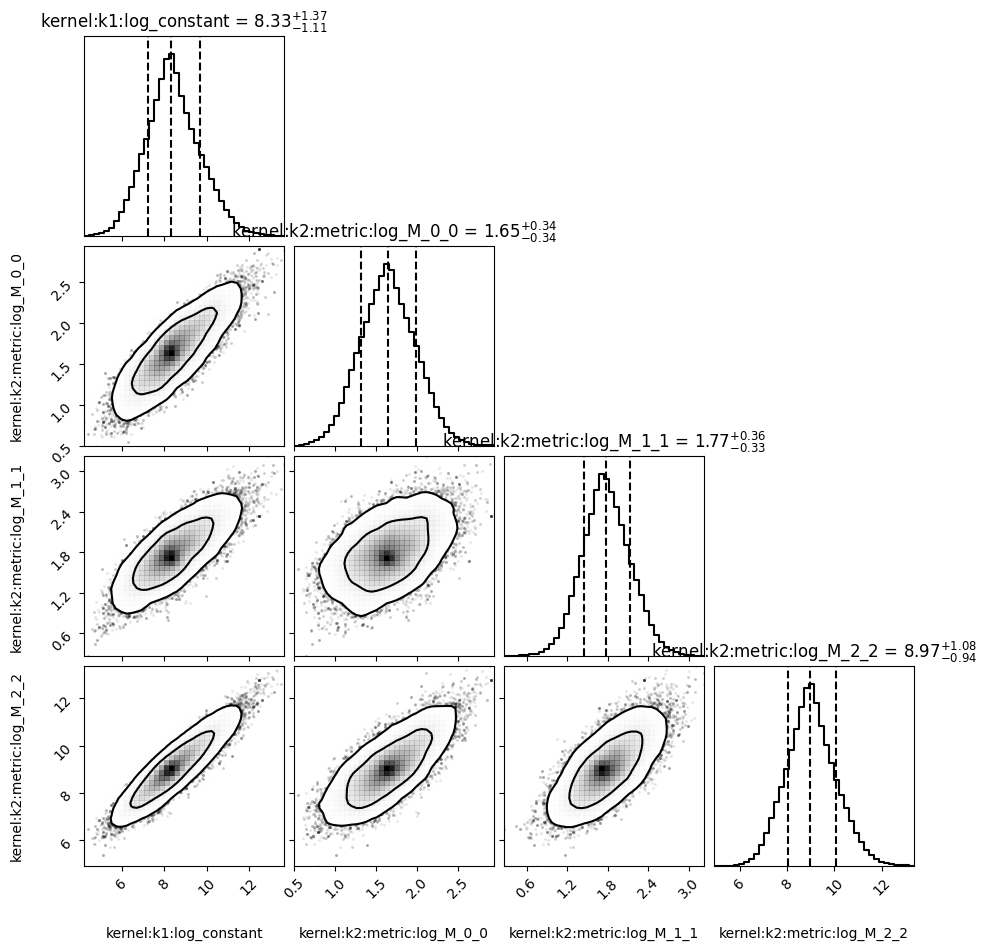
This method is a lot slower than the default hyperparameter optimisation, and may take some time to compute. The main take away from plots like this is to see whether the hyperparameters are converged, and whether they are consistent with the faster optimisation method.